
Is there anything better than picking fresh fruit that you have grown yourself? Or your cooking your very own own vegetables? It’s one of those ‘memorable and defining’ moments in life. One that often gets people hooked on growing their own produce, this fruit & veg guide will help you get started.
All Fruit & Vegetable Guides
General Guide to Fruit & Vegetables
Raspberries and Blackberries
Raspberries and blackberries are very easy to grow in different varieties of soil and partial sun, even in small spaces. They are low maintenance yet highly rewarding. We are associated with the leading raspberry plants (‘canes’) producer in Europe. Grown on the sandy fens of Norfolk and are the best quality you can buy!
Raspberries and Blackberries Planting Guide
Plant 60cm (2ft) in rows, along walls or fences, or in beds, where further support from posts may be needed. You can also grow them in large pots (40cm+ diameter), potting 3 – 5 canes around the edges. Water in well after planting.
Cut down any raspberry canes that have already fruited in November, leaving long canes for the following year’s bigger crops. Summer-fruiting varieties crop in July on last year’s growth, so when their season finishes cut down the fruiting stems. New shoots will soon emerge, and next year’s fruit will be produced on these ripened canes. Don’t cut these down, as they will provide the fruit next season. If you would appreciate fresh raspberries over a long season, grow at least one summer and one autumn variety of raspberry bushes.
Spring is the best time to prune blackberry bushes. The canes usually grow one season; produce fruit the next season, then die. Once the canes have fruited and died, you should cut them back to just above the ground.
Grape Vines
Grapevines are perfect for growing in pots or training up walls, terraces, pergolas and other supports. They will love a sunny and sheltered spot on your patio, in your garden or in a conservatory.
Grape Vines Planting Guide
It is best to plant grapevines in the spring, we suggest planting them roughly 1.2 – 1.5m apart. Dig over your soil and add some good quality compost and fertiliser to enrich the site. Keep them well watered within their first year, especially in warm and dry spells.
As soon as the grapes feel soft, they are ready to be picked. But the best way to tell is by taste! The sweeter the grape, the readier they are for harvesting. Dessert grapes should be eaten soon after they have been picked, whereas wine grapes are best pulped and made into wine.
Currants
Home-grown currants allow you to enjoy that just-picked, fresh taste that is simply delicious. They’re fantastic whether you eat them raw or use them in recipes.
Currants Planting Guide
Plant bare-root or potted currants, as soon as possible to allow for establishment before the hotter weather. Soak bare roots in water for at least an hour before planting, this will bring the plants out of dormancy.
Dig a hole about an inch longer than the length of the roots and double the width. Space them roughly 1.5m between plants. Fill the hole with soil and firm it down around the plant as you go.
Keep an eye on your plants during dry spells and make sure they are watered well. The best way to tell when currants are ready is by colour and taste, but the fruits should still be firm.
Growing Your Own Pumpkins
There are various varieties to choose from, so select one that will meet your needs. Do you want to grow a whopper to show off? One that’s great for cooking? Or a prolific fruiter producing of little baby ‘kins?
Start your growing off indoors in April where the temperature is warmer. Sow your seeds on the flat side in small 7.5cm pots or cell trays with some premium compost. Sow the seeds about 1” deep.
Place your pots in a propagator at about 20° until they begin to germinate which should take about a week.
Once germinated, wait until all risk of frost has gone, then you can replant out into their final growing spot. Choose a sheltered spot in direct sunlight to keep it warm.
Top Tip – add plenty of well-rotted manure to the soil a day or two in advance of planting.
Keep the plants well-watered, to begin with, but pumpkins generally have quite long roots that are able to find water deep within the soil, then once the flowers start to emerge, start feeding with a high potash feed every other week.
Cut back any large, over-extending stems as pumpkins will spread. You will also need to remove leaves enough to ensure the fruit is receiving enough sunlight.
Once the pumpkin appears, place a bed of straw underneath to prevent any rotting.
Your pumpkin will be ripe for picking once it turns to the right rich orangey colour. Make sure you harvest all your pumpkins before the frost hits!
How To Grow Apples
Apples are a very productive crop and they are easy to grow. There are also several varieties to choose from and each can be grafted onto different rootstocks. This means that every variety can be suitable for every garden. Apple trees can live for many years, therefore they should be grown as a long term crop. Fortunately, there are now highly dwarfing rootstocks available that you can even grow in containers. For example, our Bramley Apple tree will grow to a maximum height of 2.5m! Apples love well-drained soils with lots of organic matter. They also love a top dressing of well-rotted farmyard manure throughout the first three seasons.
Position them in a sunny spot away from frost-prone areas. If your garden is prone to frost, provide temporary protection in early spring by covering them with horticultural fleece. You can also try moving them under the protection of a well-lit shed. Bare-root trees should be planted during late autumn through to early spring when they are dormant. You can plant potted apple trees throughout the year, they just need regular watering during hot and dry periods. Most apple trees require an additional pollinating tree. However, you can also plant self-fertile varieties which will fruit all by themselves.
If you can it’s a good idea to grow at least 2 other varieties to help with pollination. The bonus to this is that you’ll get a great crop of three varieties throughout the year. Similarly, if a neighbour is growing apples or a crab apple tree nearby, it’s likely they will be pollinated by these. Our advice would be to check beforehand.
Types of Apples

This handy guide should help when it comes to selecting the best apple for you. Here we’ve picked our top 4 trees to help you decide, Braeburn, Bramley, Gala and Cox’s Orange Pippin…

Espalier training trees
Espalier training trees
Training apples and pears as espaliers is a space-saving way of growing fruit on a wall or fence. They require little pruning once established and are attractive in blossom and fruit and architectural during winter. Ornamentals such as Pyracantha are sometimes trained as espaliers.
Apples and pears that bear short fruiting spurs (not tip bearing). This method may also be used for ornamental wall shrubs such as Cotoneaster and Pyracantha.
Trees may be purchased with one to three tiers already formed or grown from one-year-old trees (maidens).
Planting and initial training
Firstly you need to establish a training system against a wall or fence. Erect horizontal wires 35-45cm (15-18in) apart between posts, or straining ‘eyes’ on walls or fences.
Trees should be planted 3.75m-6m (12-20ft) apart, according to their vigour. See our advice in trees and shrubs: planting for more information on planting trees.
Pruning an unfeathered maiden (one-year-old tree with no sideshoots)
When planting an unfeathered maiden, cut back the main stem to 30cm (1ft) from the ground
Allow the top three buds to grow out in spring, then train the top one vertically up a cane, and tie the others to canes at 45 degrees to the main stem. In November, lower them carefully until they are horizontal, tying them in with soft twine.
Cut back the vertical stem to within 45cm (18in) of the lower arms, leaving two buds to form the next horizontal layer and the top bud to form the new leader. If growth is weak, prune back the horizontal branches by one-third to downward facing buds.
The following year train the second tier in the same way as the first. Cut back competing growths on the main stem, and cut sideshoots from the horizontal arms back to three leaves above the basal cluster (the bunch of leaves denoting the start of the current season’s growth)
Repeat the process until the trees have produced their final tier and grown horizontally to fill their allotted space. Then allow two shoots to grow: tie them to the top wire and cut them back to within 2.5cm (1in) of their base the following winter
Remove the blossom in spring, for the first three years, so all of the energy goes into plant growth.
How to prune established espaliers
Trees should be pruned annually as growth slows down in August.
Cut back sideshoots growing from the horizontal leaders to three leaves from the basal cluster, 7.5cm (3in) long. Shoots from previously pruned sideshoots should be cut back to one leaf from the basal cluster, 2.5cm (1in) long
If any secondary growths develop after this pruning, cut them back to the base in September. Sideshoots on the vertical stem are best removed completely.
If there are large amounts of immature or secondary growth when cordons are pruned in August, delay pruning until mid-September. If this does not reduce secondary growth, prune in winter instead using the same method.
Renovation pruning for restricted forms of apples and pears should be started in the winter, followed by summer pruning the following year. In order to reduce over-vigorous regrowth, it should be carried out over 1-2 years.
Spur thinning
Clusters of fruit buds may need to be thinned after seven or eight years; alternatively, a few can be done each year in the dormant season (November to March), reducing over-complicated spur systems to one or two fruit buds.
Replacing missing arms in an espalier
In mid-to-late summer, chip budding can be used to replace missing arms on apple or pear espaliers; this process involves grafting a chip of wood with a live bud beneath the bark.
- First bud-grafts his chosen variety on to a dwarfing rootstock in winter, and then the growth is tied into a cane as it grows.
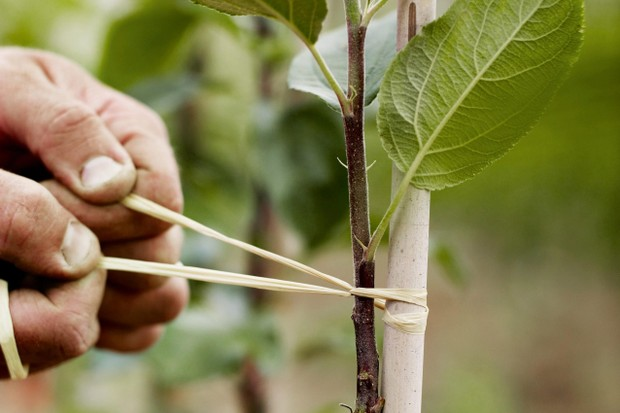
2. In August it is cut back to the required height: 35cm from the ground for a step-over, 50cm for most other shapes. After 15cm of re-growth, cut the tree back to the exact same point again. This creates a cluster of buds on one point of the stem which will then all grow at the same level, and makes it easy to select two branches to train horizontally, or at 45 degrees for a Belgian fence. Once these buds turn into shoots, You select the best-placed ones and starts tying down. A central stem can be selected from the cluster to carry the shape on upwards. The double cutting back helps to keep this central point in balance with the rest of the limbs, and prevent it from drawing too much energy.

3. Growth is tied into the frame every 10cm during the crucial early stages of training, and is only ever left to grow free for 15cm before tying in.

4. Corners can be sharp or shallow on an espalier fruit tree, but it is vital that the shape of the two sides is perfectly matched.

Espalier and other tree shapes
Double U-cordon

This shape takes a minimum of three years to form. “This is a good shape because you are breaking the vertical plane twice, each time halving the sap and slowing the whole tree down,”. “There is less chance of one limb taking over, or of the whole thing going out of control.”
U-cordon
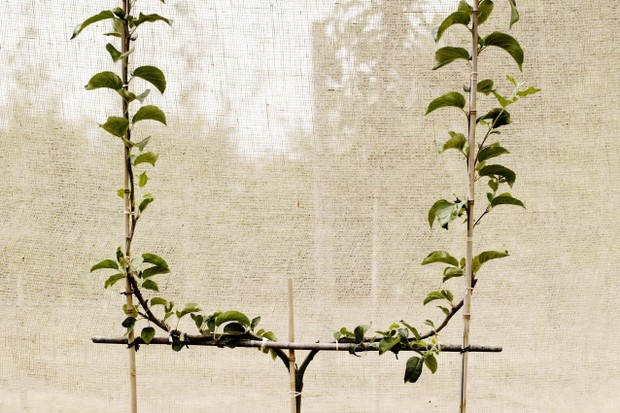
Two or three years for this espalier. “A brilliant, simple shape. Great planted either side of a path and grown over to make a free-standing arch.”
Palmette Verrier
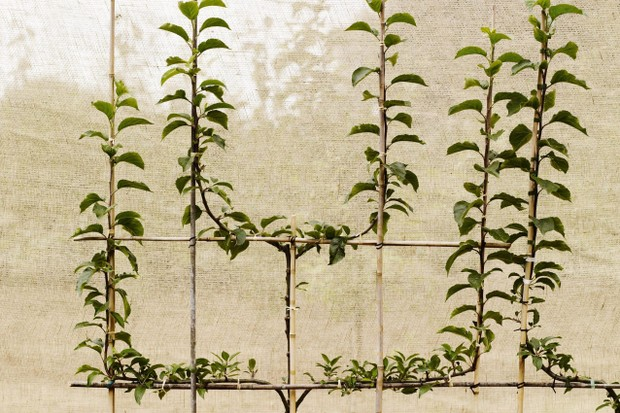
Minimum three years. “Here again the central stem is broken so it’s a lovely, easily managed espalier shape once it is set.”
Espalier

Minimum three years. “The central stem and top level will naturally be stronger and often take over. Many older trees are left as a T-shape.”
Belgian fence or Croisillon

Minimum two years. “Plant a series of these in different cultivars to make a living fence. Where they cross they often form a natural graft.”